
Understanding Truss Uplift: What It Is, Why It Happens, and How to Manage It
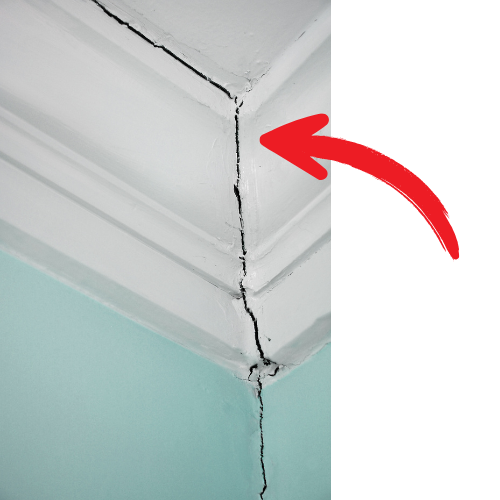
Truss uplift, also known as partition separation, is a natural occurrence most commonly observed as a ceiling crack near the interior walls of a building. While it may appear to be a structural concern, truss uplift is generally a seasonal and cosmetic issue that results from the natural expansion and contraction of wood.
This article outlines the environmental conditions and structural factors that contribute to truss uplift so it can be anticipated and accounted for during construction.
What Causes Truss Uplift?
Moisture and Temperature Differences
Wood is a porous material that expands when exposed to moisture and contracts when it dries. In a typical attic setup, the bottom chord of a truss is located above the conditioned space and is insulated. This keeps it relatively warm and dry throughout the year. In contrast, the top chords are exposed to the unconditioned attic space, which experiences greater humidity, especially in winter.
During colder months, moisture in the attic air is absorbed by the top chords of the truss. While the swelling across the width and depth of the lumber is minimal, even small amounts of longitudinal expansion become significant across the length of a roof system. For example, a top chord that is 20 feet long may extend by up to 1/4 inch under humid conditions.
Since trusses are held together with metal connector plates and are fixed at each end, the only direction that expansion can occur is vertically. As the top chords expand and rise, the webs follow, causing the entire truss to arch upward and lift the bottom chord slightly away from the interior walls.
The Role of Truss Span and Pitch
Truss uplift becomes more pronounced as the length of the top chord increases. This can occur in two primary ways. The first is that longer spans create more total top chord length, leading to more expansion when moisture levels rise. The second is that steeper roof pitches result in longer top chords for the same span compared to flatter roof designs.
A 24-foot truss with a 4/12 pitch might have approximately 13 feet of top chord on each side. That same 24-foot truss with a 12/12 pitch would have considerably more top chord to expand, increasing the likelihood of visible uplift.
Construction Practices That Exacerbate Uplift
In the field, it is not uncommon for trusses to be fastened directly to interior walls to hold both in place. However, this creates resistance against natural movement. If a truss attempts to rise and is nailed to a wall, the wall may lift slightly off the floor and the bottom chord of the truss may become stressed or damaged.
To avoid these outcomes, trusses should not be rigidly fastened to non-load-bearing interior walls. Instead, appropriate hardware such as sliding truss clips should be used to allow for seasonal movement without compromising structural integrity.
Is Truss Uplift a Structural Concern?
Truss uplift is typically a cosmetic issue. The truss remains structurally sound throughout the seasonal cycle. As humidity decreases in the attic space, the wood shrinks, and the truss returns to its original position.
To minimize visible damage, it is recommended to apply flexible caulk at the joint between the ceiling and wall and cover it with paint. This allows the joint to flex with the truss movement and reduces the appearance of cracks.
How to Minimize Cosmetic Damage
Attic Ventilation Reduces Seasonal Movement
Attic ventilation plays a significant role in the severity of truss uplift. Poorly ventilated attics tend to trap humidity rising from the conditioned space below, which increases the moisture content in the top chords. Proper ventilation helps maintain a drier attic environment and reduces seasonal expansion.
Ridge vents, gable vents, soffit vents, and vented blocking are all effective methods for increasing airflow. Powered attic fans may be used when natural ventilation is not sufficient. The goal is to keep the attic air as dry and consistent as possible year-round, which helps minimize the moisture-related expansion that causes truss uplift.
Drywall Fastening Affects Crack Visibility
Ceiling cracks resulting from truss uplift are most likely to appear when drywall is installed in a way that restricts natural movement. To minimize this, drywall clips or wood blocking can be installed at the top of the wall. The drywall should be attached to the wall or blocking, not to the truss. The first fastener into the truss should be placed 12 to 18 inches away from the wall. This creates a flexible corner where the ceiling drywall can move slightly with the truss, reducing the likelihood of a visible crack forming during seasonal changes.
This installation method is straightforward, requires no specialty tools, and significantly reduces cosmetic issues related to uplift.
Crown Molding Solutions for Finished Spaces
Cracks often show up above built-in cabinetry where ceiling movement is especially noticeable. One effective way to conceal seasonal separation is to install crown molding between the top of the cabinets and the ceiling. The key is to fasten the molding to the ceiling (or truss), not to the cabinet itself. This allows the molding to move along with the ceiling as the truss shifts, maintaining a clean finish while covering the seasonal gap.
This solution works particularly well in kitchens, bathrooms, or any space where cabinetry meets the ceiling and visual consistency is important.
Conclusion
Truss uplift is a natural and predictable result of seasonal moisture changes affecting wood in roof systems, often showing up as ceiling cracks near interior walls. While it may appear concerning, it is not a structural defect but a cosmetic issue that can be managed with proper planning and building practices. Factors like truss span, roof pitch, and attic humidity all play a role in how noticeable uplift becomes. By allowing for truss movement at interior wall connections, ensuring adequate attic ventilation, and using flexible drywall installation methods, builders can greatly reduce the visual impact. Understanding and accounting for truss uplift during construction helps maintain both the structural integrity and finished appearance of a building.
Ready to get started?
If you’re planning a project and want expert guidance on truss design, delivery, or installation support, we’re here to help. Contact us today to request a quote and get the right solution for your build.